Search My Techie Guy

Thursday, December 13, 2012

Installing Google Chrome on linux - OpenSUSE 11.3 - Sharing my experience

I set out to install Google Chrome (Google's web browser) on my PC running OpenSUSE 11.3, i had just finished doing a fresh installation of openSUSE and the default browser (firefox) was outdated! so i either had to update firefox or install a new browser, i went for the latter option.

1. Download the rpm from:  Google make sure to select the appropriate package depending on your processor hardware (32 bit or 64 bit) and operating system (linux).
Installing Google Chrome on OpenSuSe 11.3
2. My downloads save in:

marco@linux-cgqg:~/Downloads> pwd
/home/marco/Downloads

3. Change to the directory that contains your downloaded file:

marco@linux-cgqg:~/Downloads> cd /home/marco/Downloads/
marco@linux-cgqg:~/Downloads> ls -ltr
total 43124
-rw-r--r-- 1 marco users    33964 2012-12-11 13:30 sony_tv_tagsale.jpeg
-rw-r--r-- 1 marco users     6298 2012-12-11 13:32 bb-curve-8900.jpg
-rw-r--r-- 1 marco users   218639 2012-12-11 13:48 sony_tv_tagsaleuganda.jpg
-rw-r--r-- 1 marco users 43892050 2012-12-11 14:20 google-chrome-stable_current_i386.rpm
marco@linux-cgqg:~/Downloads>

4.  Install the rpm (but as you can see below, i ran into some small trouble, let us see how i get over this challenge!):

marco@linux-cgqg:~/Downloads> rpm -ivh google-chrome-stable_current_i386.rpm
warning: google-chrome-stable_current_i386.rpm: Header V4 DSA/SHA1 Signature, key ID 7fac5991: NOKEY
error: Failed dependencies:
    lsb >= 4.0 is needed by google-chrome-stable-23.0.1271.95-169798.i386

5. I suspect the installation media i used to install openSUSE could be the source of all these issues, no wonder i saw some error messages during the installation but decided to skip them. i also performed a media check (to check the dvd) before installation but it failed! but yet again i went ahead and used the same DVD to install openSUSE. so i ended up with a working operating system but with a lot of software modules missing! (so, my advise to you if you are installing a fresh copy of linux is to run a media check so you don't end up with a broken system and then you have to patch it up like am doing now. but let us see how i managed to go around the above issue and get google chrome working on my openSUSE 11.3).

Note you can download Open Suse 12.2 DVD Image Here: Open Suse 12.2
Open SuSe - Linux
6. So i decided to add the Google Chrome repo to my software repositories and then install with yast2


Using the zypper command to add the google-chrome repository:
#zypper ar http://dl.google.com/linux/rpm/stable/`uname -i` google-chrome
#
Checking to make sure your repo has been updated successfully:
linux-cgqg:/home/marco # zypper lr -d

7. Installing Google Chrome using yast2

Using yast2 to install google chrome:
linux-cgqg:/home/marco # yast2 --install google-chrome-stable_current_i386.rpm
linux-cgqg:/home/marco #

8. The rest was simple, i just followed the prompts (the usual ones; ok, accept, finish) and in a couple of minutes i was enjoying google chrome on my half broken system! still patching it up though.

Thursday, December 6, 2012

Why use the volatile Keyword in C Programming?


A volatile keyword as used in C Programming or C++ is used to to define a variable and to tell the C Compiler NOT to optimize the section or block of code where that variable is used.


take for example the following variable definition:


int age = 100;
while(age == 100)
{
  //execute this code
}


When the compiler looks at the above code, it may be tempted to optimize it to:


while(true){   //execute this code}

And the compiler is justified to do so because the variable "int age = 100;" doesn’t seem to ever change, Instead of the compiler always loading this variable from memory (if it’s not in the register) and comparing it to 100 before running that block of code, it chooses to optimize it and save on processing time.

why use volatile keywords in c-programming?
But what if that variable changes when the compiler has already modified the code (optimized the code)? may be because of an interrupt or some user input? then we would have runtime issues!!!

This is where we need a volatile keyword, to tell the compiler not to touch that piece of code because that variable which the compiler thinks that it never changes! can actually change.
And this is how we would define the variable with a volatile keyword:


volatile int age = 100;

And this would stop the compiler from optimizing the block of code where the variable “age” is present.

Working with Perl & Tk to create GUIs - Setting up the environment

Today I set out on a mission to spice up my Perl scripting skills by adding GUIs in my scripts and the best way to archive this, is by using perl’s Tk module. Here is how my story unfolded before i finally got it to work.

Operating System: Ubuntu 10.10 - the Maverick Meerkat

Checking if perl is in my environment PATH: 


root@marc# which perl
/usr/bin/perl

The above output tells me that i have perl running on my machine otherwise it would return something like “command not found” or an empty string!

Checking the version of perl am running:


root@marc# perl -v

This is perl, v5.10.1 (*) built for i686-linux-gnu-thread-multi
(with 40 registered patches, see perl -V for more detail)

Then I tried a test script to check if my default perl installation already has a Tk module but no luck! which means I had to install the perl Tk module, there are two ways:

1. Download the archive and manually install perl-Tk:

   Download Link: CPAN

Perl scripting with Tk to add Graphical User Interfaces
change to the dir where you saved your download.    Extract the archive: #gunzip Tk-804.028.tar.gz
                # tar -xvf Tk-804.028.tar
   
change to the Tk dir: #cd Tk-804.028

   #perl Makefile.PL
   #make
   #make test
   #make install


2. Use cpan to install Tk (this is the easier and recommended option)
   Make sure you are root otherwise the installation script will have permission issues!


#sudo su
#cpan
cpan[1]> 


// if you are on a direct internet connection, cpan will automatically download the required modules and the dependencies from CPAN using ftp.
//if you computer is behind a proxy that requires authentication, then you have to modify the cpan config. this is how you add the proxy configuration in cpan.


cpan[1]> o conf init /proxy/
<ftp_proxy>
Your ftp_proxy? [ftp://10.192.1.101:3128/]
//cpan tries to automatically detect the proxy as show above, enter
<http_proxy>
Your http_proxy? [http://10.192.1.101:3128/]
//enter
<no_proxy>
Your no_proxy? []

//for IPs that you want excluded from the proxy config, you can leave this blank and enter


If your proxy is an authenticating proxy, you can store your username
permanently. If you do not want that, just press RETURN. You will then
be asked for your username in every future session.

Your proxy user id? [joshua]
//enter


Your password for the authenticating proxy can also be stored
permanently on disk. If this violates your security policy, just press
RETURN. You will then be asked for the password in every future
session.

CPAN: Term::ReadKey loaded ok (v2.30)
Your proxy password?

//enter


Please remember to call 'o conf commit' to make the config permanent!

cpan[2]>install Tk

//cpan will download and install TK
//during the installation test phase, you will see a lot of pop ups, that means that your Tk library is being built and it’s an exciting moment :-)

Test your installation, try to run a script that calls the Tk module (
use Tk; ). if the script runs without errors then you are good to go. Your environment it set to run perl with Tk.

In the next posts, i will be sharing my experience with perl + Tk GUIs, this was basically about setting up the development environment and i hope you did the same.

for windows, you don’t have to go through this hustle, just go to ActiveState and download perl for your Windows OS, it comes with all the libraries including Tk.


Download Link: ActiveState
Active State Perl

Saturday, December 1, 2012

How to change your NIC MAC address - Ubuntu 10.10?

If you find yourself in a situation where you need to manipulate your NIC's MAC address (for example if your MAC address has been flagged at the switch! or if you want to hide your PC's physical identity!), Just follow these simple steps:
My Techie Guy

1. #sudo su (yes, you have to be root to change system settings, i hope you have the root password!)
2. #ifconfig -a (Note the interface you wish to manipulate, e.g. "eth0")
3. #ifconfig eth0 down (first bring the interface down)
4. ifconfig eth0 hw ether 00:BA:12:00:FE:00 (give it a new MAC address)
5. ifconfig eth0 up (Bring the interface back up)
6. ifconfig -a (check to make sure that your changes have been accepted)
7. Please note that these changes are temporary and they don't persist after a reboot!
8. Have fun hiding your ID :-)

How to change your IP address on command line - Ubuntu ?

If you find yourself in a situation where by you have to manually configure your IP address using command line on Ubuntu. just follow these simple steps (Am using Ubuntu 10.10):
My Techie Guy
1. Make sure you know the IP address you want to assign to your computer and also the subnet mask, for example; IP = 10.192.1.190 and Subnet Mask = 255.255.255.0
2. #ifconfig -a  (This command displays the current interface configuration, use it to note the interface name, for example "eth0")
3. #sudo su  (yes! you have to be root to modify system settings, this will ask you for the root password, punch it in and hit enter)
4. #ifconfig eth0 down  (first bring the interface down)
5. #ifconfig eth0 inet 10.192.1.190 netmask 255.255.255.0 (assigns eth0 that IP address and subnet mask)
6. #ifconfig eth0 down up (bring the interface back up)
7. #ifconfig -a (verify that your configurations have been effected)
8. Have fun!

Sunday, November 18, 2012

Make use of the free online website design applications

With absolutely no background in website programming you can be able to design and deloy professionally looking websites using these free website builders. Here are some of the few I have used and found to be really amazing.

Has a very good user-friendly website builder which you can use to create and deploy a website in less than one hour with no prior knowledge in web programming. This is by far my favourite solution for creating a free website or blog in the shortest time, plus the free domain name you get for your website doesn't look bad compared to other free website tools like Google Sites! infact the free domain names from webs.com are cool; here are some examples of sites i have created using webs.com (all i did was just drag and drop!):
Design a website in seconds by just doing "drag and drop"!

WORDPRESS.COM
Yet another good place where you can set up a free website in seconds but is mainly good for creating blogs. So if you are looking for a good blogging tool, wordpress is something you should consider. Wordpress has a wide range of free applications ( "Widgets" ) which you can embed in your free website to archive many functionalities.
Wordpress is another good tool for creating free websites.
GOOGLE SITES
I like google sites because of the wide range of applications (or what Google calls "Gadgets") that you can integrate into the free website; Forms, maps, videos, picture slides, documents, etc but I hate their free url! It's long and ugly! However, there is a work around. You can buy a custom domain name and link it to your Google site. I have done this before and it's pretty cool.
BLOGGER
it would be very unfair if I didn't list blogger among the nice free website builders yet the website(my-techie-guy) where you are reading this post is actually a blog and I created it using BLOGGER. Yet again, I like blogger for the wide range of gadgets which I can embed into my website including custom html and java scripts. And the free URL format for blogger is better than that of Google Sites.

Sunday, November 11, 2012

Make use of the free online storage services

Today I have officially launched my very own “Make Use Of” series of techie articles. These are going to be short articles about the cool stuff that I find handy in our techie world. I hope you get the same satisfaction!

A few days ago my portable drive got “fried”! And it was a bad day because literally all my stuff was on that device which is now as good as “Junk”. The latest backup was of three months back, so I practically lost the new data that I had gathered in 3 months.

I had a company laptop in my previous employment and I had never bothered to buy one of my own, all I did was make a monthly back of my important stuff to that portable drive. But a time came when I had to exit! So here I was with my portable disk hoping to buy a laptop soon! And considering that I was also exiting the country, I said to myself that “I will buy the laptop when I have settled in my new life” but the portable drive was not thinking about the same thing!

I knew about free online storages services before but I had never taken it seriously, I guess I was being lazy! Consider this a wakeup call for you too and you should have started yesterday to backup your important stuff online! This is actually what cloud computing is about! Not only will you be able to backup your files, but you will also be able to edit them and save your work.

So far I have landed on two good ones, and by good I mean all factors considered; Easy to use, Security, Amount of free space and much more:
  1. Google Drive

    Space offered: 5GB
    Security: username & password (same for your Gmail account) plus HTTPS (a secure protocol).
    Accessibility: Desktop application (downloaded and installed on your PC) and as an online service through a web browser.
    Functions: upload files, edit documents online, download files, synchronize files.

  2. Space offered: 2GB for starters but you can gain another 3GB by being royal to dropbox.
    Security: username and password plus HTTPS (a secure protocol).
    Accessibility: Desktop application (downloaded and installed on your PC), Android application (downloaded and installed on your android device) and as an online service through a web browser.
    Functions: upload files, edit documents online, download files, synchronize files.
    (Click here to get dropbox now!)
These two should do for now but will update the list just in case I land on more free online storage services. And in case you want to contribute another good one, please leave a comment.

Wednesday, November 7, 2012

Predicting Uganda's Voting Application 2016 – Funny!

Finally the so called electronic voter's card is going to become a reality (not sure about this!) in our dear country Uganda and the electro commission has already appointed a team of programmers to design the voting application. Our snoops managed to still the algorithm and here it is. Now you know what to expect!

For those who will be voting NRM back into power:
Voting for NRM


And for those warming up to vote FDC:
Voting for FDC

Sorry for DP, UPC and Other parties!
Voting for DP (Same as for UPC and Others)

Monday, November 5, 2012

How to manually configure packet data (GPRS/EDGE/3G/4G) on your android phone?


Most of the time, your telecommunication service provider will run an application that can automatically push packet data settings (APNs, Proxy IP and Port, username, password, MCC, MNC, Authentication type, APN type) to your phone and this application is smart enough to know when you have changed your SIM card to a new phone and will send you new settings. But what if this doesn't happen? Well, configuring packet data on your android phone is not rocket science! And this is what you have to do:
  1. Menu
  2. Settings
    Settings
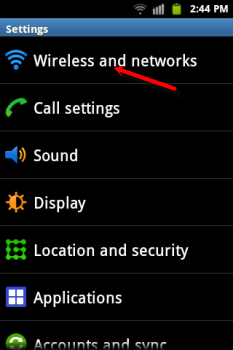
  3. Wireless and Networks
  4. Scroll down to “Mobile networks” (set options for roaming, networks, APNs).
    Select Mobile networks
  5. Tick “Use packet data”
  6. Select “Access Point Names”
    Select "Access Point Names"
  7. Click the "Options"  button on your phone and Select “New APN”
    Android Options Button
    * Name: can be anything (for example your service provider's name! I will call mine “mtn internet”.)
    * APN: you need to know your service provider's APN (Access Point Names). You can search your service provider's website or call the customer care. Mine is “yellopix.mtn.co.ug” and I got it by searching the mtn website.
    * Proxy: usually smart phones don't need to send their traffic through proxies (WAP Proxies) so you can leave this blank.
    * Port: it's for the WAP proxy above, so leave this blank as well.
    * Username: leave this blank (most telecos don't implement authentication by this method)
    * Password: leave this blank.
    * Server: blank
    * MMSC: we don't need this for internet! It's necessary if you intend to use this APN for sending Multimedia Messages (Picture Messages from your phone.)
    * MMS Proxy: not required for internet!
    * MMS port: blank
    * MCC: This will already be automatically filled and the phone learns it from your SIM card.
    * MNC: This is also automatically filled and is learnt from your SIM card.
    * Authentication type: none
    * APN type: internet

  8. Click the "Options"  button again and hit “Save”.
    Save your APN settings
  9. Your new APN will appear in the APNs list with the name that you choose in bullet 7 (above).
  10. Select your new APN using the radio button next to it.
  11. That's it, navigate to your phone browse and test your connection.
Have fun and leave a comment if you have any questions!

Monday, October 22, 2012

How to use your Android Phone as a Portable Wi-Fi Hotspot


Most of the time you find yourself in a situation where you have internet connectivity on your phone (Edge or 3G provided by your telecommunication service provider) and you wish to share this connection with your; family, friends, or even share with your laptop or tablet PC.
In this way, you don't need a modem or a wireless router (cost cutting!).

Well, I use this a lot with my Android phone and it's one of the reasons I love android phones. I have done this on; Samsung Galaxy SII, Sony Xperia arc S, Samsung Galaxy Mini, Samsung Pocket, Samsung galaxy tab, and for all these phones, the procedure is the same and very easy.
It should also be the same for any other type of phone running Android OS.

Just follow these simple steps.
  1. Menu
  2. Settings
  3. Wireless and networks

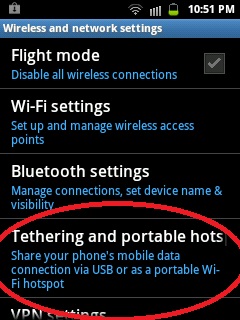
  4. Tethering and portable hotspot

  5. Portable Wi-Fi hotspot settings
  6. Configure portable Wi-Fi hotspot
    -Network SSID; Give your Wi-Fi hotspot a name e.g. “Alice” or “Josh's net”

    -Security; Select “WPA2 PSK”. If you leave it “Open”, then even your neighbours will be able to freely connect and you won't like your phone bill at the end of the month!!

    -password; Set a password for your hotspot(at least 8 characters and mix alphabet with numerical numbers. For example “letmein12”). The “show password” check box is to help you display your password in clear text, just in case you need to confirm or in case you forget your password.

    -Save; save your configuration


  7. Portable Wi-Fi hotspot (Tick this box)

  8. You will see a message saying; "Turning on …" and then you will see another message in the status bar; “Tethering or hostpot active”.

That's it, you can now search for wireless networks on your laptop or tablet PC and you will be able to see your hotspot. Click connect, it will ask you for a password, punch it in and have fun.

To disable your hotspot, you just have to uncheck the “Portable Wi-Fi hotspot ” box, and you will see a message saying; "Turning off …"

For any questions sign into my blog using your Gmail account and leave a comment. I will respond as soon as possible.

Tuesday, April 10, 2012

How to check for your phone's IMEI?

In the first place, what’s this IMEI? And why do I need to know the IMEI for my phone?

IMEI is International Mobile Equipment Identity, it’s a unique number used to identify mobile phones. 

It’s important to know and note the IMEI for your mobile phone because this number uniquely identifies you device on a GSM network and can be used to track or block a stolen phone from accessing the network.

In the event that your phone is stolen, you can approach your network provider and ask them to track the stolen phone or blacklist it from accessing the network using its IMEI. If the phone is blacklisted, it means that no one will be able to use it to access any network even if the SIM card is changed.

so, now that you know what IMEI is and why it’s important to know it and note it, how do you check the IMEI for your phone?

There are two methods:
  • It’s usually printed inside the battery compartment of your phone. Just remove the battery and you will be able to see this number.
  • Enter *#06#
 Make sure you save it in your important notes; you never know when you might need it.