Search My Techie Guy

Thursday, December 9, 2010

Making eforms (Surveys and Questionnaires) - Save Paper, Save Trees


Motivation:
->>Don't Print, Save the trees!
->>Go Green
->>Heal the world! Make it a better place!
->>Earth needs YOU.
->>Let's face it! It's easier saving paper than planting trees.
->>Save our planet think green.
->>Save Paper, Save Trees, Save the Planet!

->>Take care of earth and she will take care of you


Are you trying to conduct a survey or research using a questionnaire and are worried of the burden that comes with such an exercise; designing the form in the traditional MS word, printing the form, distributing the form, collecting the completed and printed forms, issuing countless reminders for feedback, and finally, compiling and manually entering the responses into a spreadsheet for analysis. Not forgetting the direct costs that come with these tasks; printing fees, transport fees, Telephone fees (yes! Remind the respondents), data entry fees (yes! Bulk surveys). This method also reduces data entry errors and most importantly, don't forget that we are trying to "Go Green" so please embrace the "Green Revolution".
Well, in this article we will change all that hustle into “Click, Click and Send”. Fun, isn’t it?
We will create an electronic copy of the questionnaire(or eform) which you will then send out to your target respondents, each respondent will directly fill the questionnaire and then email the information back to you by just clicking a button right in the e-form. We will then import all the returned data files into excel in a single move and your data will be ready for analysis.
A survey/research that was probably going to take you months to finish will be done in just a few days depending on how fast your respondents are at returning email.
Tools: Use Adobe LiveCycle Designer ES in standalone mode (part of the Adobe Design Premium CS4).
Step 1:
Create the eform using Adobe LiveCycle Designer. This is the form that you distribute to the people who will fill the form, “Adobe LiveCycle Designer Help” has a very nice “Quick Start Tutorials” with a very well explained and elaborate example; “Creating an office function survey form”. It would really be a waste of time for me to go back through the same steps, so please use this help guide to learn how to design your first eform. It’s very simple. And if you need an overview before you acquire Adobe LiveCycle; http://help.adobe.com/en_US/livecycle/8.2/overview.pdf
Step 2:
Save the questionnaire as a PDF document to your local PC. Make sure your eform has the “[Submit by Email]” button.
Step 3:
Connect to your internet email account (e.g. gmail or yahoomail) or launch your local email application (e.g MS Outlook) and attach the questionnaire.
Step 4:
Send out your eform to the target respondents, include some brief instructions on how they should fill the eform and send it back to you. When a respondent clicks the “[Submit by Email]” button in the eform, it generates a report/data file in XML format. If the respondent is using a local email application on their machine, it will automatically launch it and attach the report file plus the email address of the sender (your email address). If the respondent is using an internet email account e.g. gmail or yahoomail, it will prompt him/her to save the file to his/her local PC which they can later send as an attachment (equally simple). The best way is to first try the whole process by yourself before you send it out so that you can get the real feel of what your respondents will be going through. Try both for a respondent who is using a local email application or an internet email. Then you can write brief and precise instructions to your respondents. End users only require Adobe Reader to electronically fill the eform and send the eform data to the originator of the eform.
Step 5:
You will receive the report as an XML document, download it to your local PC and rename it report1, repeat this for all the responses received by renaming them; report2, report3, report4 … report(x).
Step 6:
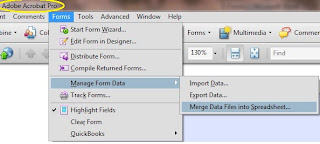
Open the orignal eform/questionnaire that you created and saved on your local PC, this will open in Adobe Acrobat Pro. Go to “Forms” > “Manage Form Data” > “Merge Data Files into Spreadsheet”
Step 7:
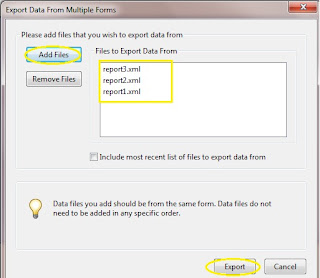
Click “[Add Files]” to add all the report files and click “[Export]”; this will create one spreadsheet containing all the data from all the report files.
Save the generated spreadsheet and you are now ready to analyze your data. Have a fun and good luck.

Wednesday, December 1, 2010

Quick Check - UNIX Scripting (bash/ksh/) One Liners

Example: Display only the file names in a directory - "for loop"
This code can be used to copy, delete or move files, just replace the "echo" command with a "cp", "rm" or "mv" command.
for i in `ls -ltr | awk '{ print $9 }'`;
do
echo $i;
done

Example: Delete all files in a directory except the most recent - "for loop"
#!/bin/bash
DIR=/export/home/nomwesj/
cd $DIR
lastfile=`ls -ltr|tail -1|awk '{print $9}'`
for files in `ls -ltr|grep -v $lastfile|awk '{print $9}'`
do
    echo "Removing File(press Ctrl+C to abort):" $files
    sleep 2
   #rm $files
done

Example: How to "comment out" a block of code in a bash/ksh script
:<<'comment2'
Anything within this
block
will be treated as a comment
comment2

Example: List log files older than (x) days
List logs older than 7 days:
find /export/home/log/* -mtime +7 -exec ls -lrt '{}' \;
Delete logs older than 7 days:
find /export/home/log/* -mtime +7 -exec rm '{}' \;

Wednesday, November 24, 2010

How to Set up SSH-KEYs between 2 Unix Servers (Solaris 10)? – Step by Step

SSH-KEYs can be very important when set up between 2 trusted servers especially if you wish to automate some processes between the servers using scripts (ksh, bash, tcsh). In this way, it makes it easy to write a script to login back and forth between the two servers without worrying on how you can pass on the passwords. This is secure because you don’t print passwords in your scripts.
SSH-KEYs have on several occasions helped me in writing backup scripts, server health check scripts, server process automation and other fancy stuff that can be achieved in bash/ksh/tcsh scripting. At the end of this tutorial, you should be able to successfully setup SSH-KEYs between two trusted servers; Server1 and Server2. Once SSH-KEYs have been successfully setup, you should be able to connect from Server1 to server2 in just one line of command without need for a password. Good luck

Challenge:
Server1 has a user “josh” who wishes to setup SSH-KEYs with a user “bob” on Server2

Step 1: Check Connectivity between the Servers

Make sure that server1 can communicate to server2 at the IP level, also make sure that SSH is running on both servers and that you can successfully SSH from server1 to server2.

#ping “server2_ip_address” e.g. #ping 192.168.10.2
#ssh
bob@“server2_ip_address” e.g. #ssh bob@192.168.10.2


If it’s the first time you are connecting to server2 through SSH, you might get something like this; just answer yes and ENTER.

Output:
The authenticity of host '192.168.10.2 (192.168.10.2)' can't be established.
RSA key fingerprint is 0d:60:aa:ad:91:a7:c6:ae:5d:f7:ae:21:60:82:81:9d.
Are you sure you want to continue connecting (yes/no)?


Step 2: Start keygen process

josh@server1:~> ssh-keygen -t dsa

Output:
Generating public/private dsa key pair.
Enter file in which to save the key (/export/home/josh/.ssh/id_dsa):
Created directory '/export/home/josh/.ssh'.
Enter passphrase (empty for no passphrase):
Enter same passphrase again:
Your identification has been saved in /export/home/josh/.ssh/id_dsa
Your public key has been saved in /export/home/josh/.ssh/id_dsa.pub
The key fingerprint is:
f0:8e:31:ab:e2:9a:02:4d:77:f5:44:23:ae:23:85:b6 josh@server1


Step 3: Check SSH-AGENT

josh@server1:~> ssh-agent

Output:
SSH_AUTH_SOCK=/tmp/ssh-XX1RcNaX/agent.31740; export SSH_AUTH_SOCK;
SSH_AGENT_PID=31741; export SSH_AGENT_PID;
echo Agent pid 31741;


josh@server1:~> SSH_AUTH_SOCK=/tmp/ssh-XX1RcNaX/agent.31740; export SSH_AUTH_SOCK;
josh@server1:~> SSH_AGENT_PID=31741; export SSH_AGENT_PID;
josh@server1:~> echo Agent pid 31741;

Output:
Agent pid 31741

Step 4: SSH-ADD

josh@server1:~> ssh-add /export/home/josh/.ssh/id_dsa

Output:
Enter passphrase for /home/jimbo/.ssh/id_dsa1:
Identity added: /export/home/josh/.ssh/id_dsa (/export/home/josh/.ssh/id_dsa)

Step 5:  Making sure server1 is in the list of known hosts on Server2

when you ssh into server2 from server1 the first time, server2 adds the IP address of server1 in a file called known_hosts, so the second time you login, server2 should straight away prompt you for a password without doubting the authenticity of server1!
so try to ssh into server2 from server1, login and exit.

josh@server1:~> ssh bob@server2

Output:
bob@server2's password:
Last login: Tue Nov 25 06:22:11 2010 from josh
Have a lot of fun...


bob@server2:~> exit
Output:
logout
Connection to bob closed.
Step 6: SCP (Secure Copy) the pub key from Server1 to Server2
josh@server1:~> scp /export/home/josh/.ssh/id_dsa.pub bob@server2:/export/home/bob/.ssh/josh.pub
Output:
bob@server2's password:
id_dsa.pub 100% |*************************************************| 602 00:00
Step 7: Copy the Pub Key (josh.pub) that was copied to server2 into Authorized Keys
josh@server1:~> ssh bob@server2
bob@server2's password:
Last login: Tue Nov 25 06:30:11 2010 from josh
Have a lot of fun...
bob@server2:~> cd /export/home/bob/.ssh/
bob@server2:~> cat josh.pub >> authorized_keys
bob@server2:~> exit
logout
Connection to bob closed.
Step 8:  Test your new SSH-KEY
josh@server1:~> ssh -i /export/home/josh/.ssh/id_dsa bob@server2
Last login: Tue Nov 25 06:45:11 2010 from josh
Have a lot of fun...
bob@server2:~>
Once you get to the command prompt of server2, then your SSH-KEY is working. You can use this KEY to login to the server always without need for password. You can also use the KEY to automate the login within a BASH/KSH/TCSH script. Have fun.


Friday, November 19, 2010

Cool Gadgets and Gizmo Gifts for your Guy – My Techie Guy Suggests

Christmas is around the corner and it’s that time of the year when you want to show love and affection to all the dear ones in your life. It could be your boyfriend, fiancé, best friend, brother, cousin, uncle or just a guy friend.
Fortunately all men have an innate love for gadgets. Even men who aren't really into techie stuff won't really complain about getting a cool new gadget as his Christmas present. So the chances of making the gift recipient extremely pleased when he takes out that new gizmo from the Christmas box is definitely bigger than when you put any other stuff in it.
So as “Your Techie Guy” I bring to you the best gizmo gift suggestions to give to that guy that has really been special to you this year.
There are so many different gadgets/gizmos out there. How do you know which one will be most appreciated? Well, there's a perfect match for every man and I made the choice even easier by categorizing them. Good luck and Merry Christmas.
· The computer Junkie - someone who is addicted to computers. He will be on it every day trying out new and weird stuff. He doesn't go out much.

Get him the latest mini laptop in town; I love the Sony VAIO UX.
This mini laptop has a sliding 4.5-inch display which reveals its keyboard, very small and portable with rounded edges.
VAIO UX runs on a strong mobile processor of 1.2GHz. In addition, it has 48GB Solid State Drive storage type to conserve power and increase battery life, Wireless WAN, Wireless LAN, Bluetooth GPS receiver, biometrics fingerprint sensor, and up to 7 hours of continuous operating time. It also provides front and back digital cameras.

This could be your only chance to get him out of that room because he knows he can pocket his VAIO. (I know it still sucks to be out with someone carrying a laptop!! but girl, this is the only option, besides it’s a cool gadget.) 
  
· The Puzzle addict Is your guy so much into puzzles? well, i have two good suggestions just for you;

     
      Get him the SUDOKU TOILET PAPER.
      The world’s first Sudoku Toilet RollPaper is now available! A real Funny Gizmo gift! and trust me he will love it.
 
      or Get him the PUZZLE ALARM CLOCK.    
     The Puzzle Alarm wakes you up by firing three puzzle pieces up in the air, then it is your mission to get the pieces and put them back in the alarm clock or it won’t turn off until then, Nobody sleeps through this!


· The Party Guy Here is something for you if your guy is the “Party Guy”; one who likes “bling bling”, night clubs, concerts and night parties. Get him THE SHOW OFF T-shirt. Has a built in sound sensitive graphic equalizer panel. As the music beats, the shirt’s equalizer lights up to the beat of the music, this is so cool and funky, and the lights flash in green, yellow or red. Good for concerts and parties. If your guy falls in this category! Look no further.
     · The Party Host - Is your Guy planning to host a Christmas party? Surprise him with the FUNKY STRAWS. Amaze his friends and guests with one of the coolest party gadgets around. Try the new FUNKY STRAWS! They don't disappoint and it's Cool stuff!
   To be continued ......watch the space!!


Wednesday, November 17, 2010

SSH Port Forwarding using PuTTY (ssh/telnet) Client

Are you faced with a situation where by you don’t have direct access to a desired server (because of a firewall, ACL, or VLANs), yet you wish to access a service (say http on port 80) running on that server? The good news is that you can use an intermediate server (which you have direct access to) to establish a logical connection to the desired server and get that service running on your local PC as thou you were connected directly to the server.
In this case the intermediate server will act as a proxy server and will forward any connections coming from your local PC to the desired server through the configured ports. Here is a step by step guide on how to make port forwarding work with PuTTY.

SSH Port forwarding using PuTTY

In order to use port forwarding to connect from your local machine to a port on a remote server, you need to:
1.       Open your PuTTY SSH client, Under Category: Session, Enter the IP address of the proxy server (e.g. 192.168.20.30), enter a session name if you like (e.g. My_Proxy) and click “[Save]”. Select the session name (My_proxy) and click “[Load]”.
     
2.       Under Category: SSH > Tunnels, check “Local ports accept connections for other hosts” and also check “Remote ports do the same”. Enter the source port e.g 2000, Enter “Destination” IP and Port separated by a colon (e.g. 192.168.20.50:80) and click “[Add]”. The details of your port forwarding should appear in the list box.
      
3.       Go back to category: Session and Click “[Save]”. Click “[Open]” to start a SSH session to the proxy server. Provide the required credentials; username and password.
4.       Once you have successfully logged in your “Proxy” server, open your browser and enter the URL as below: http://127.0.0.1:2000/
5.       You should without fail be able to access http service running on the remote server as if you had direct access to that server. What is happening is that PuTTY listens to all connections on your machine coming in through port 2000 and forwards them to the proxy server which in turn forwards them to the remote computer. So you have a logical connection between your local PC and the remote server.
6.       Have fun, you are now free from those firewall policies and ACLs that were denying you access.
Download PuTTY Here:
http://www.putty.org/
http://www.soft32.com/Download/Free/PuTTY/4-19137-1.html
http://putty.en.softonic.com/
http://www.chiark.greenend.org.uk/~sgtatham/putty/

Friday, November 12, 2010

Step by Step Password Recovery on a CISCO 2500 series router

1. Boot the router
2. Interrupt the boot sequence crtl+c
3. type "o" this brings up a menu of configuration register options, e.g
    >o
4. Type "o/r" to change the config register value, e.g
    >o/r 0x2142
5. Reload, type I (for Initialize)
    >I
6. The router reloads and asks if you want to use setup mode, because no startup-config is used.
   Answer no, press ENTER to go into user mode.
7. enable
8. copy start run
9. config t
10. enable secret josh (“josh” will be your new password)
11. config-register 0x2102
12. copy run start
13. reload

For detailed information, i recommend:
http://www.cisco.com/en/US/products/hw/routers/ps233/products_password_recovery09186a0080094795.shtml
http://networking.ringofsaturn.com/Cisco/cisco2500password.php
http://www.streetdirectory.com/travel_guide/149381/networking/_the_configuration_register.html
http://www.2000trainers.com/cisco-ccna-10/ccna-change-configuration-register/

Quick Step by Step Password Recovery for CISCO Routers without loosing current configuration


Are you in a situation where by you have forgotten the secret password to your CISCO router and yet don’t want to lose your configuration, or your IT Guy who holds all the passwords to the routers woke up one morning and choose not to show up for reasons best known to himself, yet business has to continue as usual. Well, here is the quickest and easiest step by step guide to get you up and running without losing your configuration.
1. Boot the router (sorry you have to do this, I hope you implemented some redundancy in your network)
2. Interrupt the boot sequence by pressing crtl+c
3. To ignore the contents of Non-Volatile RAM or ignore configuration, do this:
rommon 1 > confreg 0x2142
4. Reset your router by typing reset at the ROMMON prompt, i.e.
rommon 2 > reset
5. The router reloads and asks if you want to use setup mode, because no startup-config is used.
   Answer no, and press ENTER to go into user mode.
6. Enter the router privileged EXEC mode  
    
> enable
#
7. Now copy the start-up configuration into the running configuration 

# copy start run
8. Enter the configuration mode 

# config t
9. Set a new password "mynewpassword"

Router(config)#enable secret mynewpassword
10. Change the configuration register back to 0x2102 so that the router can boot from NVRAM on next boot.

Router(config)#config-register 0x2102
Router(config)#do wr
Router(config)#end
11. Now copy the running configuration (remember it has your new password :-) into the start-up configuration) 

# copy run start
12. No reboot your router by entering reload that the privileged EXEC mode 

# reload
13. The router will reboot and you should be able to login with your new password without loosing your original configuration. 
Find more information about the configuration register on these recommended sites:

Monday, November 8, 2010

How to enable root login from SSH - UNIX

Are you trying to login to a Solaris server as root from an SSH client but can NOT get in yet telnet works fine. Well the reason it’s not working is because the Solaris standard installation will inhibit root login via SSH. You can change this in the “sshd.conf” file. There is an option you can change to ‘yes’ and after a restart of the sshd daemon (or system restart) it works fine.

Problem: Tried to login to a solaris server as root from PuTTY client using SSH, Telnet worked fine but SSH refused.
Error: Using keyboard-interactive authentication.
    Access Denied
    Password:
Solution:
  1. cd  /etc/ssh
  2. vi  sshd_config
  3. Search for this parameter “PermitRootLogin” and set it to “yes” i.e; PermitRootLogin  yes
  4. save and quit
  5. restart the sshd daemon and try to login again from ssh.
For more information on how to restart the sshd daemon and how to configure other ssh parameters, see the manual pages for sshd:


Wednesday, October 27, 2010

How to jump start a car?

Have you been in a situation where you forgot your car lamps on? And when you come back, the car battery is already drained to zero and your car won’t start.
All you need is a pair of jumper cables and a Good Samaritan driving by. Just follow the few steps below and your car will be up and running in less than 10 minutes.
o    Connect one red clamp to the positive (+) terminal of the dead battery.
o    Connect the other red clamp to the positive (+) terminal of the good battery.
o    Connect one black clamp to the negative (-) terminal of the good battery.
o    Connect the other black clamp to a piece of grounded metal on the dead car. Look for shiny metal (not painted or oily) that is attached to the engine. Usually a nut, bolt or other protruding shiny metal will work. You may see a small spark when you connect to a good ground. As a last resort, you may connect to the negative (-) post of the dead battery, but this risks igniting hydrogen gas coming off the battery.
o    Start the car with the good battery and keep the Engine running
o    Lastly, start the car with the dead battery and keep the Engine running.
o    You can now remove the jumper cables and drive on.