A. Maintaining the System Running Environment | |||
# | Command | Description | Expected output |
1 | # top | Check the node to make sure that no single process is consuming all of the available memory. Check the physical free memory of the system and whether the SWAP free memory meets the requirements. | The screen lists the 15 most active processes that are currently running on the node. For a single process, the CPU usage should be less than 40%. The total CPU usage should be less than 70%. The memory utilization (real - free)/real should be less than 70%. |
2 | # df –h | Check free space of the system hard disk. | The usage of the file system space should be less than 80%. |
3 | # ntpq -p | check the time synchronization | A table of system clocks appears. The line representing the system clock currently used by the node is marked with an asterisk (*). |
B. Maintaining the Unix System Logs | |||
1 | # more /var/adm/messages | Check this file for error messages | Make sure the log file doesn’t contain the following abnormal information: warning, panic, error, fail, exception, fatal |
2 | # cd /var/log/ # ls –ltr # more syslog.x Where “x” is the most recent syslog number. | Check for the most recent system log file and analyze it. | Make sure the log file doesn’t contain the following abnormal information: warning, panic, error, fail, exception, fatal, reject, alarm etc. |
C. Maintaining the Unix System Processes | |||
1 | # ps -ef | Check which processes are running on the server, which user started the process (UID), process ID (PID), and the command that started the process (CMD). | A list of all processes currently running on the system. The PID is important when you wish to “kill” the process, and the CMD is used to start the process again |
2 | # kill -9 PID_X Where PID_X is the process ID | Kill the process. Note the command used to START the process (CMD) before you kill it; you might want to START it again. | Use this command to kill processes that are using up the system resources. This can be seen from the “#top” command. Use the “#top” command to confirm that some system resources have been freed up after killing the process in question. |
D. Maintaining the TCP/IP Ports | |||
1 | # netstat -an | grep port_x Where port_x is the port number where the application is listening on or communicating on with other external applications. | Verify that the TCP/IP connection is in “LISTEN” or “ESTABLISHED” mode | If the port is functioning properly, you should receive a LISTEN/ESTABLISHED response. A hanging port will return a CLOSE/WAIT response. |

Wednesday, January 19, 2011
Unix Systems Administration - Server Health Checks
Quick Check – Unix Commands (My Techie Guy's Unix Cheat sheet)
Check the software/kernel version of your unix/linux OS.
# uname -a
Creating a system user with username “user1”
# useradd -d /export/home/user1 -m user1
# passwd user1
Know which applications/drivers are supported (64-bit or 32-bit) by the UNIX kernel
# isainfo –kv
List all configurable hardware resources physically present in the UNIX machine.
# cfgadm -al
List all services and check their state (online or disabled) on Solaris 10, e.g. check if the ftp service is online.
#svcs -a| grep ftp
Enable, disable, and Restart services on Solaris 10, e.g. restart the ftp service
#svcadm restart svc:/network/ftp:default
How to fix the “mkdir: I/O error”
#This usually happens when the server recovers from a serious power failure. Suddenly you can’t create a dir on the partition!L!
Example: mkdir: "/var/opt/run": I/O error
#cat /etc/vfstab to get info some info on the mount point.
#Identify the “mount point” and “device to fsck” for this directory ("/var/opt/run")
#umount –f /var/opt/ where “/var/opt/” is the mount point
#fsck /var/opt/ or you can also run the “fsck” on the “device to fsck” which is the raw disk, the latter option is recommended. E.g. fsck /dev/vx/rdsk/vol01 where “/dev/vx/rdsk/vol01” is the “device to fsck”.
#mount /var/opt/ to re-mount the partition.
#And hope it works – Have FunJ.
Find a file in the current directory that is less than one day old (< 24hrs).
find ./ -type f -mtime 0 -exec ls -ltr {} \;
Find a file in the current directory that is greater than 1024bytes (1K) in size.
find ./ -type f -size +1024 -exec ls -lh {} \;
How to fix "Host key verification failed"?
#Have you tried "ssh" from “Server1” to a remote “Server2” and you get this error message?!L!:
#ssh user1@10.10.5.5
Connecting to 10.10.5.5 ..........
@@@@@@@@@@@@@@@@@@@@@@@@@@@@@@@@@@@@@@@@@@@@@@@@@@@@@@@@@@@
@ WARNING: REMOTE HOST IDENTIFICATION HAS CHANGED! @
@@@@@@@@@@@@@@@@@@@@@@@@@@@@@@@@@@@@@@@@@@@@@@@@@@@@@@@@@@@
IT IS POSSIBLE THAT SOMEONE IS DOING SOMETHING NASTY!
Someone could be eavesdropping on you right now (man-in-the-middle attack)!
It is also possible that the RSA host key has just been changed.
The fingerprint for the RSA key sent by the remote host is
03:60:9d:d4:30:d1:54:79:78:9b:4a:e3:9e:1c:21:2e.Please contact your system administrator.
Add correct host key in /.ssh/known_hosts to get rid of this message.
Offending key in /.ssh/known_hosts:25RSA host key for 10.10.5.5 has changed and you have requested strict checking.
Host key verification failed.
Solution:
#This simply means that "Server2" has changed identity and is sending a key different from what “Server1” has in its "known_hosts" file. This usually happens when “Server2” has undergone a software upgrade or someone changed the RSA key.
#On “Server1”; look for the "known_hosts" file, usually under: /.ssh/
#vi /.ssh/known_hosts
#look for the line with “Server2” IP address, you can also tell the line from the warning message:
"Offending key in /.ssh/known_hosts:25" meaning it's at line 25
#Delete the entire line/record
#Save :wq!
#Try again. this time the authentication should not fail but “Server1” will ask you if you want to added the new identity of “Server2”. Just hit "y" for yes and it should connect.
Have fun ... J
Note: This cheat sheet will keep growing based on personal daily experiences as a Unix Server Administrator.
Thursday, January 6, 2011
How to Create email Signatures in Microsoft Outlook 2007/2010
Microsoft Outlook 2007
· Open your Outlook email client.
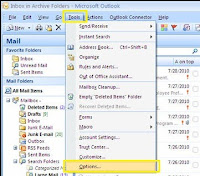
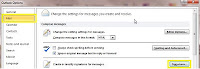
· Click [Tools] from the main menu and Select [Options].
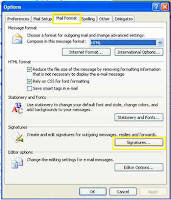
· Click the [Mail Format] tab on the pop-up window, and then click the [Signatures] tab.
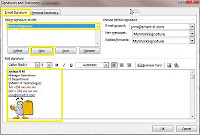
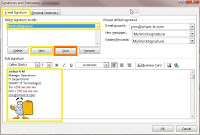
· Click the [Email Signature] tab and click [New] to create a new email signature.
· Enter the name of the Signature (e.g. MyWorkSignature, you can have so many email
signatures for one email account) and click OK.
signatures for one email account) and click OK.
· Select the Signature name you just created to edit it, enter your details in the signature editor provided and click [Save](refer to the snap shot below).
· Now on the top right corner of the same window is "Choose default Signature", use it to select the email account where you wish to use this signature and also choose which signature you want to use for "New messages" and for "Replies"
· Click [OK] to finalize and close all the open windows.
· Have fun with your new email Signature
Microsoft Outlook 2010
 · Have fun
· Open your Outlook email client.
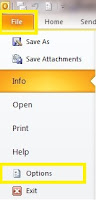
· Click [File] from the main menu, and select [Options].
· On the “outlook options” pop up window, select [Mail] and click the [Signatures] button on the right.
· A “Signatures and Stationary” window pops ups, this is similar to the one in Outlook 2007(above) and the steps that follow are also the same.
Subscribe to:
Posts (Atom)